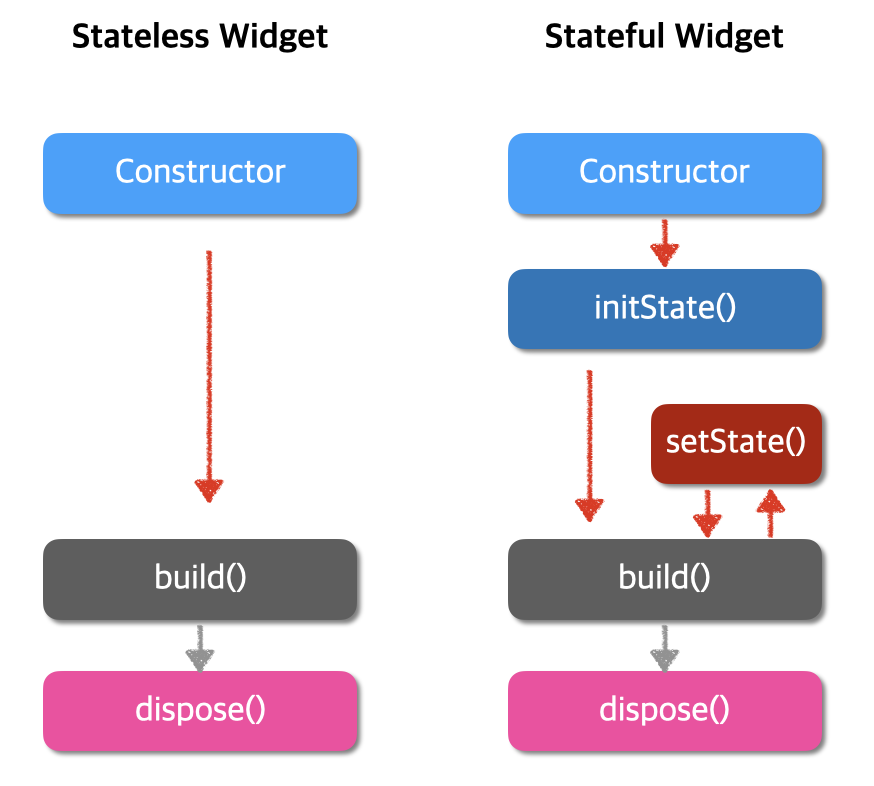
Flutter에서 UI를 구성하는 주요 요소인 StatelessWidget과 StatefulWidget에 대해 설명하고, 이들이 상태(state)를 어떻게 관리하는지 정리해 보겠습니다.
1. StatelessWidget
**StatelessWidget**은 불변의 상태를 가지며, 빌드할 때마다 동일한 UI를 렌더링합니다. 상태가 변하지 않기 때문에 한 번 빌드된 후에는 UI가 변경되지 않습니다. 이는 주로 정적인 UI 요소를 렌더링할 때 사용됩니다.
• 특징:
• 상태가 변하지 않음.
• 생성자에서 필요한 값을 받아 빌드 메서드에서 UI를 렌더링.
• 상태를 가지지 않는 간단한 위젯에 적합.
• 예제:
import 'package:flutter/material.dart';

class MyStatelessWidget extends StatelessWidget {
  final String title;

  MyStatelessWidget({required this.title});

  @override
  Widget build(BuildContext context) {
    return Scaffold(
      appBar: AppBar(title: Text(title)),
      body: Center(
        child: Text('This is a stateless widget'),
      ),
    );
  }
}

void main() {
  runApp(MaterialApp(
    home: MyStatelessWidget(title: 'Stateless Example'),
  ));
}
2. StatefulWidget
**StatefulWidget**은 동적인 상태를 가지며, 상태가 변할 때마다 UI를 재빌드할 수 있습니다. 상태는 위젯 자체가 아닌 State 객체에서 관리됩니다. State 객체는 StatefulWidget과 연결되어 있으며, 상태 변경 시 setState 메서드를 호출하여 UI를 업데이트합니다.
• 특징:
• 상태가 변할 수 있음.
• State 객체에서 상태를 관리.
• UI가 상태에 따라 동적으로 변경될 필요가 있는 경우 사용.
• 예제:
import 'package:flutter/material.dart';

class MyStatefulWidget extends StatefulWidget {
  final String title;

  MyStatefulWidget({required this.title});

  @override
  _MyStatefulWidgetState createState() => _MyStatefulWidgetState();
}

class _MyStatefulWidgetState extends State<MyStatefulWidget> {
  int _counter = 0;

  void _incrementCounter() {
    setState(() {
      _counter++;
    });
  }

  @override
  Widget build(BuildContext context) {
    return Scaffold(
      appBar: AppBar(title: Text(widget.title)),
      body: Center(
        child: Column(
          mainAxisAlignment: MainAxisAlignment.center,
          children: <Widget>[
            Text('You have pushed the button this many times:'),
            Text(
              '$_counter',
              style: Theme.of(context).textTheme.headline4,
            ),
          ],
        ),
      ),
      floatingActionButton: FloatingActionButton(
        onPressed: _incrementCounter,
        tooltip: 'Increment',
        child: Icon(Icons.add),
      ),
    );
  }
}

void main() {
  runApp(MaterialApp(
    home: MyStatefulWidget(title: 'Stateful Example'),
  ));
}
3. State
State 클래스는 StatefulWidget과 연결된 상태를 정의합니다. State 객체는 StatefulWidget의 생명주기 동안 유지되며, 상태가 변경될 때마다 setState 메서드를 호출하여 UI를 재빌드합니다.
• 생명주기:
• initState(): 처음으로 상태를 초기화할 때 호출.
• didChangeDependencies(): 종속성 또는 상위 객체가 변경될 때 호출.
• build(): UI를 렌더링할 때 호출.
• setState(): 상태를 변경하고 UI를 재빌드할 때 호출.
• dispose(): 위젯이 소멸될 때 호출.
• 예제 (위에서 사용한 예제에 포함됨):
class _MyStatefulWidgetState extends State<MyStatefulWidget> {
  int _counter = 0;

  @override
  void initState() {
    super.initState();
    // 초기화 작업 수행
  }

  @override
  void dispose() {
    // 정리 작업 수행
    super.dispose();
  }

  void _incrementCounter() {
    setState(() {
      _counter++;
    });
  }

  @override
  Widget build(BuildContext context) {
    return Scaffold(
      appBar: AppBar(title: Text(widget.title)),
      body: Center(
        child: Column(
          mainAxisAlignment: MainAxisAlignment.center,
          children: <Widget>[
            Text('You have pushed the button this many times:'),
            Text(
              '$_counter',
              style: Theme.of(context).textTheme.headline4,
            ),
          ],
        ),
      ),
      floatingActionButton: FloatingActionButton(
        onPressed: _incrementCounter,
        tooltip: 'Increment',
        child: Icon(Icons.add),
      ),
    );
  }
}


요약
• StatelessWidget: 불변의 상태를 가지며, 정적인 UI를 렌더링하는 데 사용됩니다.
• StatefulWidget: 동적인 상태를 가지며, 상태 변경에 따라 UI를 재빌드할 수 있습니다.
• State: StatefulWidget과 연결된 상태를 관리하며, 상태 변경 시 UI를 업데이트합니다.
'프론트엔드 > Flutter' 카테고리의 다른 글
| flutter controller 로 위젯 및 상태 제어 (6) | 2024.07.24 |
|---|---|
| flutter photo gallery 사용하기 (6) | 2024.07.24 |
| flutter firebase 를 이용한 이메일 로그인 구현 (8) | 2024.07.23 |
| flutter todo-app 만들기 (5) | 2024.07.23 |
| flutter scrollview pagination 예제 및 정리 (4) | 2024.07.22 |